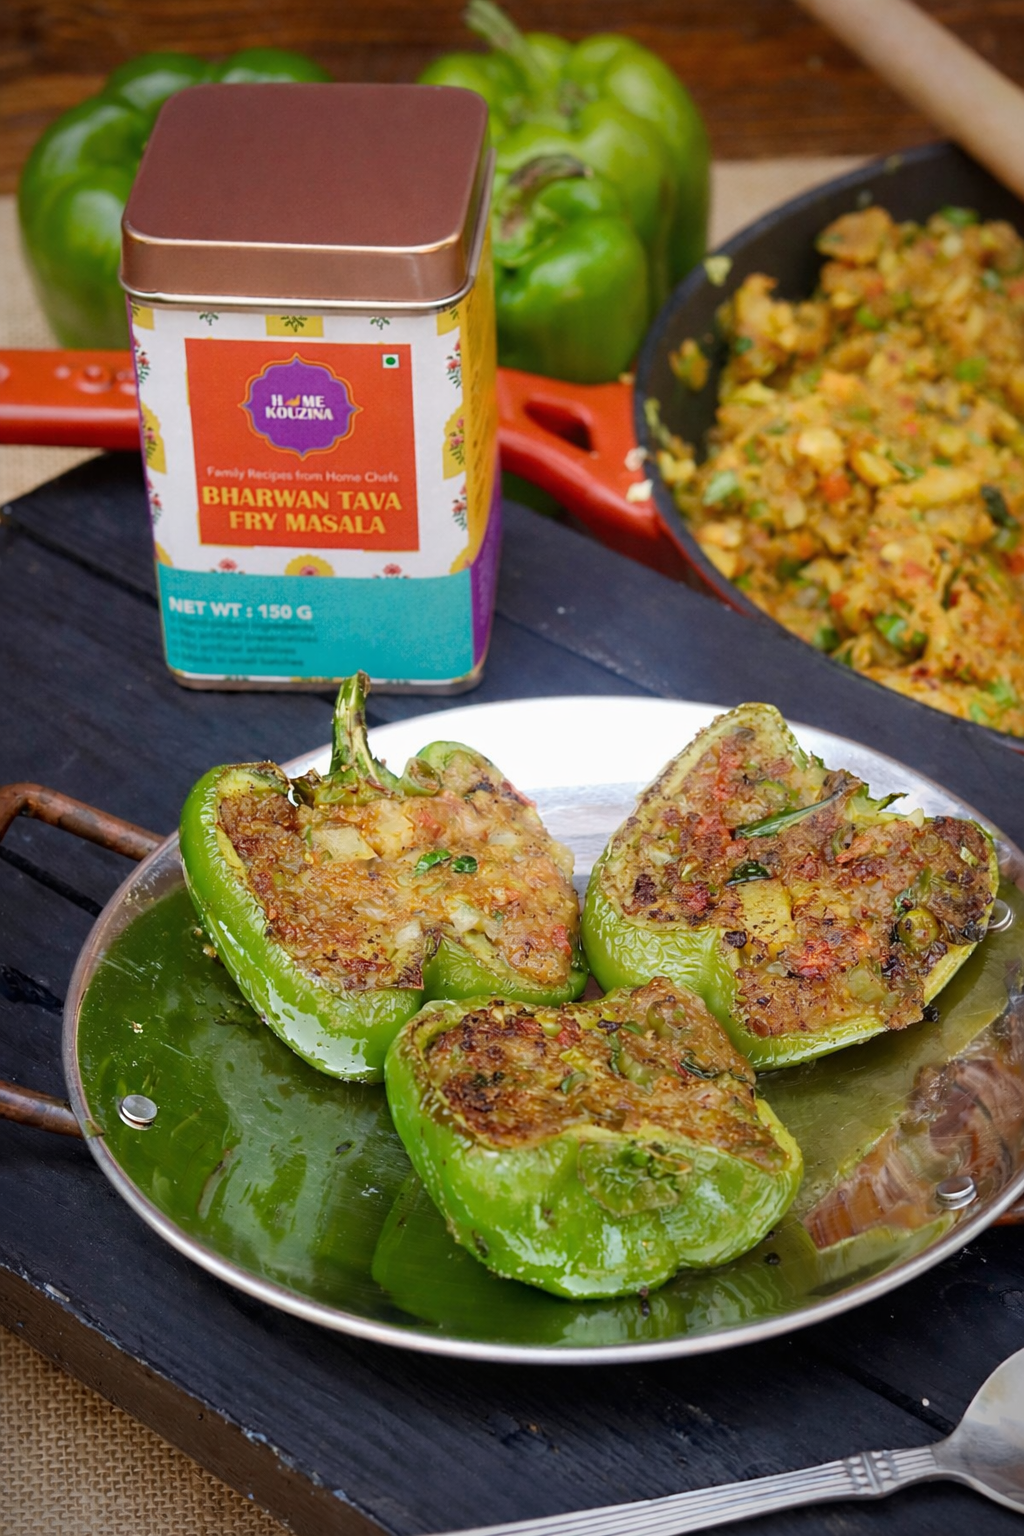
Appetizers

Cabbage Rolls

Just back from an indulgent gourmet weekend experience dinners need to be light yet delish . So here’s what’s on our plate this evening : savory cabbage rolls .
These stuffed cabbage rolls are a delightful appetizer loaded with veggies .An easy to make dish makes a delightful addition to our weeknight menu .


Course Appetizer
Servings 4 persons
Preparation Time 15 minutes
Cook Time 10 minutes

Ingredients for the Cabbage Rolls

( 1 cup=200 ml, 1 tbsp=15 ml)

1 cup Cottage cheese (paneer) crumbled.
¼th cup Amul Cheese, grated
2 tbsp Red capsicum, finely chopped
2 Nos. Green chilies, finely chopped
½ cup Carrots, finely chopped
½ cup French beans, finely chopped
2 tbsp Green capsicum, finely chopped
A few drops of Tabasco
2 tbsp Coriander leaves, finely chopped
8 – 10 large Cabbage leaves
Salt to taste
Chili oil to drizzle
1 – 2 tbsp Olive oil for cooking

Instructions for the Spaghetti Fernandes

1. Blanch the cabbage leaves in boiling water for 2 – 3 minutes. Do not let it overcook. Immediately put it in ice cold water for 1 minute. Drain and keep aside to dry on a tea towel.
2. In a pan heat 1 tbsp olive oil. Sauté the green chilies, capsicums, carrots, French beans for 1 – 2 minutes. Add in the cottage cheese and sauté. Add in the Amul Cheese and mix well. Season with salt and tabasco and garnish with coriander leaves. Keep aside to cool.


3.


Dry the cabbage leaves. Add 1 tbsp of the cottage cheese mix on 1 blanched leaf and roll as shown above. Make the rolls and keep aside.
4. Just before serving, heat olive oil in a pan. Cook the cabbage rolls on both sides. Serve hot with chili oil.
Desserts

Strawberry Cobbler

As February wraps us in its cozy embrace, love whispers through the air. What better way to celebrate Valentine’s Day than with a dessert that captures the essence of romance? Enter our Strawberry Cobbler, a symphony of ruby-red sweetness and buttery indulgence. Picture candlelight, shared laughter, and this delightful treat-the perfect recipe for a heartwarming evening.

Course Dessert
Servings 6 – 8 pax
Preparation Time 15 minutes
Cook Time 1 hour

Ingredients for the Strawberry Cobbler

(1 cup=200 ml, 1 tbsp=15 ml)

2 – 3 cups Fresh strawberries washed and cut into quarters.
1 cup Granulated sugar
70 gms Butter (I used salted)
2 cups All purpose flour (maida)
2½ tsp Baking powder
2 cups Milk
2 tsp Vanilla extract
Vanilla ice-cream to serve

Instructions for the Spaghetti Fernandes

1. Preheat oven to 175℃.
2. In a large bowl mix 1/3rd cup sugar and the strawberries.  Set aside to macerate
3. In another bowl mix the flour, remaining 2/3rd cup sugar, milk, baking powder and vanilla extract.  Mix well with a whisk to avoid forming lumps.
4. Take melted butter in an oven proof dish.  Add the flour-milk mixture over the butter. Spread it evenly.  Next, spoon the strawberries over the batter evenly, leaving any extra liquid in the bottom of the bowl and discarding it.
5. Bake in a preheated oven for 55-60 minutes until the batter is golden brown and the strawberry juices are bubbling.  Leave aside to cool complete.  Serve warm with vanilla ice-cream.


Appetizers

Pickled Strawberries & Brie Bruschettas

My favorite part about the winter is the spirit of friendliness and fun in the air.  Everyone seems to be in a more relaxed mood, and is keen on spending afternoons and evenings filled with long catch-ups.

I love hosting impromptu get-togethers with loved ones, but I used to always be stuck on what to serve at a moment’s notice.  Since I developed these Pickled Strawberries and Brie Bruschettas, however, that hasn’t been an issue!

They require 5 ingredients, are ready in 15 minutes, and are unbelievably delicious.  That can’t be beat!

Servings 4 persons
Course Appetizer
Preparation Time 5 minutes
Cook Time 10 minutes

Ingredients for the Pickled Strawberries & Brie Bruschettas

(1 cup=200 ml, 1 tbsp=15 ml)

1 small wheel Brie cheese
8 slices Sourdough bread
8 tbsp Pickled strawberries (recipe shared on blog)
Olive oil for toasting
Fried rosemary springs for garnish

Instructions for the Pickled Strawberries & Brie Bruschettas

1. Preheat oven to 180℃.
2. Slightly toast the sourdough bread slices with olive oil.  Cut a piece of brie cheese and place on each slice.
3. Toast in the oven until the cheese melts.
4. Top with pickled strawberries; garnish with fried rosemary springs and serve immediately.


Appetizers

Pickled Strawberries

Upgrade your charcuterie board with some incredible Pickled Strawberries!

These are so simple to make, and thanks to the flavor-packed marinating liquid, they’re the most unique-tasting strawberries you’ve ever had.

They’re sweet, acidic, and savory.  What more could you want?

Servings Makes about 1 small jar
Course Appetizer
Preparation Time 10 minutes
Cook Time Nil

Ingredients for the Pickled Strawberries 

(1 cup=200 ml, 1 tbsp=15 ml)

10-12 Strawberries, halved
2 tbsp Lemon juice
1 tsp Sriracha hot sauce
1 tsp Toasted sesame oil
1 tsp Garlic minced
1 tbsp Finely chopped spring onion greens
2 – 3 springs Rosemary fresh
Zest of lemon
1 tsp Toasted nigella seeds
½ inch Cinnamon
1 tbsp Sugar
¼ tsp Cinnamon powder
¼ tsp Salt

 Method

1. Combine all ingredients in a mason jar.  Shake well.
2. Let the strawberries sit for 1 – 2 hours before serving.

Note: 

  1.  You can chill the pickled strawberries and serve.  It lasts for 2-3 days.  Add the spring onion greens fresh before serving.
  2.  Makes a fabulous and easy condiment to pair with goat cheese, brie cheese.
  3.  Serve as an accompaniment on a charcuterie board too.


Desserts

Chocolate Strawberry Pudding

When I was younger, my cousins and I would have so much fun ransacking the kitchen, concocting wild and delicious dessert treats for ourselves (away from our parent’s watchful eyes, of course!).  From chocolate syrup on digestive crackers, to DIY ice cream sandwiches, we tried it all.

This Chocolate Strawberry Pudding came about through a similar prompt – I was craving dessert, and didn’t have anything ready, so I pulled my favourite things together, and voila!  It’s sinful, decadent, and absolutely delicious.

Servings 4 (makes 1 square 6”x6” glass dish)
Course Desserts
Preparation Time 10 minutes
Cook Time Nil

Ingredients for the Chocolate Strawberry Pudding 

(1 cup=200 ml, 1 tbsp=15 ml)

2 cups Chocolate sponge cake crumbled
1 cup Strawberries, cut into quarters
1 tbsp Caster sugar
2 cups Vanilla ice cream
1 cup Chocolate ganache
1 tsp Coffee powder mixed wit ½ cup water
Mint leaves for garnish

Instructions for the Chocolate Strawberry Pudding

1. Mix the coffee powder and water, and bring to a boil. Cool down completely and mix in with the chocolate ganache.  The ganache consistency should be pourable.
2. In a glass dish crumble the chocolate cake.  Pour half of the ganache over the crumbled cake.
3. Mix the strawberries and sugar, and keep aside for 10 minutes. Add half of the macerated strawberries over the cake.
 4. Now add a layer of vanilla ice-cream over it.
 5. Spread the remaining strawberries over the ice cream.  Drizzle the remaining ganache over it.  Refrigerate at least for 1 – 2 hours in the fridge (not freezer).  Garnish with mint leaves and serve.


Snacks

Chivda

It’s the season to indulge but it’s also the season of unannounced guests.   To wow your guests and to have the yummiest snack on hand – make my delicious Chivda!

It’s perfect for tea-time or even to serve with your meal.

Servings 8 – 10 persons
Course Snacks
Preparation Time 10 minutes
Cook Time 10 minutes

Ingredients for the Chivda 

(1 cup=200 ml, 1 tbsp=15 ml)

5 – 6 cups Poha
1½ cups Oil for frying
¼th cup Peanuts
¼th cup Cashews
3 tbsp Roasted gram dal (daliya)
2 springs Curry leaves
3 – 4 nos. Green chilies
½ tsp Red chili powder
¼th tsp Turmeric powder
1 pinch of citric acid
Salt, as per taste
Powdered sugar, as per taste

Instructions for the Chivda

1. Heat the oil in a deep fry pan or kadhai.  When oil is hot, test it by dropping one flake of poha. It has to rise up immediately without browning.
2. Now, take a big sieve.  Take the poha in it and touch the sieve bottom to the hot oil to fry the poha.  Stir it constantly.  It should puff up immediately. Remove from oil and keep aside in a plate line with kitchen tissues.
3. Similarly fry the cashews, peanuts, green chilies, daliya (roasted Bengal gram) and neem leaves one by one and keep aside.
 4. Mix all the fried ingredients – season the mixture with salt, turmeric, citric acid crystals and sugar.  Mix well.  Store in an airtight container and consume as required.

Note: 

  1. The deep-fried oil is not good to use again after frying, so should be discarded.
  2. Medium and thick poha should be used for deep frying purposes.
Desserts

Baked Rasgulla

BAKED RASGULLA    Add some sparkle to your Dhanteras celebrations with my Baked Rasgulla recipe! It’s a sure-shot winner with kids and adults and comes together in no time.

All you need is store-bought rasgulla, a couple of additional ingredients and let your oven do the rest of the work!

I also have some helpful tips so be sure to read the whole recipe.

Servings 4 – 6 persons
Course Dessert
Preparation Time 10 minutes
Cook Time 15 – 20 minutes

Ingredients for the Baked Rasgulla 

(1 cup=200 ml, 1 tbsp=15 ml)

10 Nos Rasgullas
1½ cups Milk (whole milk)
¾th cup Unsweetened mawa
½ can or 200 gms Condensed milk (Nestle)
8 – 10 Strands of saffron (dissolved in ½ cup milk)
1 tbsp Saffron milk masala doodh powder (optional) – (Sethi brand is what I used)
2 – 3 tbsp Chopped pistachios for garnish
2 – 3 tbsp Chopped almonds for garnish
Silver varq for garnish

Instructions for the Baked Rasgulla

1. Squeeze the syrup from the rasgullas and arrange in an oven proof dish.
2. Heat the milk in a heavy bottom pan.  Let is start thickening a bit, then add the mawa to it.  Stir continuously to avoid any lumps.
3. Add the condensed milk to it and stir.  Mix the saffron strands in it.  Let the mixture thicken a bit for 5 – 10 minutes on a medium flame.  (It should not be too thin nor too thick).
 4. Pour the milk mixture over the rasgullas.  Add the saffron doodh masala powder over it.  Add ½ of the pistachios over it.
 5. Bake in a preheated oven @ 180℃ for 5-7 minutes until the sides bubble and it looks a bit set.
6. Garnish with remaining pistachios, almonds and silver varq.  You can either serve it warm immediately or cool for 2 hours in the fridge and serve chilled.

Note: 

1. Squeeze the entire sugar syrup from the rasgullas.

2. Don’t use thin low fat milk.  Also the milk mixture should not be too thin.  It will ruin the taste due to watery content.

3. Don’t make mixture too thick as it thickens after baking and also whilst cooling in the fridge.

4. Taste the milk mixture after adding mawa and condensed milk.  If you like it sweeter, add a little more condensed milk.

Appetizers/ Snacks

Dudhiya Kebab (An Awadhi Recipe)

One of my all time favorite recipes- Dudhiya Kebab! An heirloom recipe from the Awadh region, dudhiya kebab comes together very quickly, can be customized in terms of the size and is a sure shot crowd pleaser!

Servings 4 persons
Course Snacks / Appetizer
Preparation Time 10 minutes
Cook Time 20 minutes

Ingredients for the the Dudhiya Kebab

(1 cup=200 ml, 1 tbsp=15 ml)

½ kg Paneer
1 tbsp Shah jeera (black cumin seeds)
2 Nos (180 grams) Boiled potatoes
3 tbsp Besan
2 – 3 tbsp Tomato ketchup  (Maggi hot n sweet)
70 gms Grated Amul Cheese
Black salt to taste
Salt to taste
1 tsp Red chili powder
1 tsp Honey
1 No. Juice of 1 lemon (Indian size)
A few Kasuri methi leaves
A pinch Of garam masala powder
Bread crumbs to coat
Ghee for shallow frying

Instructions for the Dudhiya Kebab

1. Boil the potatoes and mash them well.
2. Cut the paneer into roundels or squares with a cookie cutter.  It should be ½” in thickness.
3. In a pan add 2 tbsp ghee.  Sauté the shah jeera, besan and red chili powder.  Sauté the besan well.
4. Add in mashed potatoes, salt, lemon juice, honey, black salt, tomato ketchup, garam masala, cheese and mix well. Cook for 1 – 2 minutes.
5. Stuff this mixture between two round paneer slices and coat the paneer with bread crumbs on both sides.
6. Shallow fry the stuffed paneer slices in ghee on both sides and serve hot with mint chutney.


Mains

Raw Mango Curd Rice

Raw or ripe, you can’t go wrong with mango. Raw Mango Curd Rice is a summer essential as it is light, flavourful, and tangy.

Curd rice is known by many names throughout the country, and in every household it is a comfort food. For days when you are sick or want to keep it light, curd rice is your go-to meal.

This simple yet delicious dish compliments the weather beautifully. Swipe to see the recipe. Share your raw mango recipes in the comments below.

Servings 2 persons
Course Main Course
Preparation Time 10 minutes
Cook Time 10 minutes

Ingredients for the Raw Mango Curd Rice

(1 cup=200 ml, 1 tbsp=15 ml)

2 cups Cooked rice
2 cups Beaten yogurt
½ cup Raw mango grated
½ cup Cucumber grated (squeeze the excess water)
2 – 3 Green chilies, finely chopped
¼th cup Milk (chilled)
A handful of Coriander leaves finely chopped

Ingredients for tempering

(1 cup=200 ml, 1 tbsp=15 ml)

1 – 2 tbsp Oil
2 tsp Mustard seeds
½ tsp Urad dal (white one)
½ tsp Chana dal
A pinch Of heeng (asafoetida)
2 – 3 Whole red chilies
A few Curry leaves

Instructions for the Rice

1. Take the boiled and cooled rice in a dish.  Mix all ingredients for the rice except salt and keep aside in the refrigerator to cool for 1 hour at least.
2. Heat the oil.  Temper the mustard seeds, dals, heeng, curry leaves, chilies.
3. Add tempering to the rice. Mix salt. Check for seasonings and add as per taste.  Serve at once.
4. Best served chilled.

Note:  We add salt just before serving as the cucumber should not release the liquid

Breakfast

Classic French Toast

With Rakhi coming up, I’m sure you’ve all started to think about what to make for your siblings to treat them on this special day. Cooking them a meal is always a heartfelt gesture, and I’m positive they’ll absolutely love this Classic French Toast!

It’s so easy to make, and a fun recipe to make with your loved ones. The best part about French Toast is that you can pile it high with your favourite toppings. My favourite thing to do when I’m hosting a brunch is to make lots of French Toast, and have a toppings buffet! That way, people can try different combinations, and it makes it even more fun.

Servings 2 persons
Course Breakfast
Preparation Time 10 minutes
Cook Time 10 minutes

Ingredients for the Classic French Toast

(1 cup=200 ml, 1 tbsp=15 ml)

4 Nos. Brioche bread slices (preferably a day or 2 old)
2 Nos. Eggs
½ cup Milk
2 – 3 tbsp Salted butter
A pinch Of cinnamon powder
½ tsp Vanilla essence
Honey / maple syrup to drizzle
Whipped cream to serve
Nutella to serve
Icing sugar to dust

Instructions for the Classic French Toast

1. Mix the eggs, milk, cinnamon powder in a bowl and whisk well.  Add in the vanilla essence.
2. Heat a pan and melt butter.  Dip the brioche slice in the egg-milk mixture and coat well.
3. Fry the coated bread slice on the pan with butter turning and flipping it on both sides. Repeat with the remaining 3 slices.
4. Before serving, dust with icing sugar.  Drizzle maple syrup or honey. Serve with whipped cream and Nutella spread.